Have you ever tried Korean-style braised beef ribs? This is really delicious. I think beef is really compatible with soy sauce and green onions.
It is delicious but really demanding. There are so many steps to follow. If you skip any, the whole taste will deteriorate. Further, there is not much to eat even though we have a mass production - more than a half is bones.
I found beef rib fingers in a supermarket sometime ago, whose bones are all removed. When I made braised beef ribs with this, there was not much work involved and it was so delicious. Probably you know that there is a very tough silver skin on those ribs. We don't have to remove this. Furthermore, it turns out quite edible.
Ingredients
beef rib fingers 3kg
vegetables - shitake mushrooms, chestnuts, carrots and green onions
1. Make a bulgogi sauce. Put eveything in a blender and mix it. It will make 1.2-1.3 liters of sauce.
2. The bulgogi sauce is quite weak to marinate ribs, which have more fat and thus need more salt and sweetness than bulgogi. So, springkle 1/2 teaspoon of salt, 1 tablespoon of sugar and some ground pepper over 3kg of ribs.
3. Pan-fry ribs until all the surface gets browned.
4. Put ribs in a large pot and pour all the sauce. Bring it to a heat for the first 5 minutes and lower the temperature to the lowest level and braise for 3 hours.
5. Add cut vegetables at 2.5 hours of braising.
6. Add cut green onions 10 minutes before 3 hours.
1) the surface of beef has to be seared at 120-180 degrees. The browner the surface gets, the more flavors the steak will have. However, it shouldn't be cooked over 200 degrees, at which undesirable tastes and health risks will start to develop. This requires your pan to be hot but not too hot.
2) the inside of beef should be tender and moist. The center of the meat should exceed a certain temperature (e.g. 50 degrees for raw).
It looks complicated? Not at all. Just follow instructions below.
1. Bring out a NON non-stick pan. If you don't have one, use your stainless steel pot.
This is more than half a recipe. You can NEVER make a good steak on a non-stick pan.
First, there is a non-stick material coated on the pan and this makes the ingredients float on a pan - of course, this is a whole point of not-sticking to a pan. As there is no direct contact with a metal, the browning doesn't take place immediately.
Second, you need to preheat the pan before placing meat, right? However, manufacturers specifically tell you not to. Non-stick pans are originally designed to fry eggs and etc, not meant to be heated to a high temperature. The non-stick material (PTFE) starts to generate gas at a high temperature. Don't have a bird around you when using a non-stick pan. It will die. Birds are reported to die even at 205 degrees. In other words, you kitchen is now as dangerous as a mine.
Do not use a pan with grill marks. Most likely, the areas with grill marks will get browned and the rest doesn't get browning and eventually flavors are left undeveloped.
2. Season beef with salt and pepper. Be generous about salt. Some chefs recommend not to use pepper at this stage as pepper flakes tend to get burned on the pan, which I find very sensible recommendation. But, I still like pepper flakes at this.
2. Preheat the pan at medium heat (it depends on your gas stove) for 2.5 minutes. Add oil on the pan. Wait until oil starts to smoke. This is 250 degrees (I use grapeseed oil) - the total preheating time will be around 3 minutes. If you preheat the pan more than 3 minutes, the steak might turn black.
3. Place meat on the pan.
4. Flip the meat after 30 seconds.
5. Brown the each side after 30 seconds.
6. Flip the meat every 30 seconds.
A long time ago, we had to flip meat only once during the cooking. Otherwise, someone would yell. But, not any more.
Let's say you want your steak medium, you will get only the center of the meat medium with the rest being well-done, if you flip it only once. By flipping every 30 seconds, we can get most of the inside medium, with only the surface well-done.
7. Use your watch to determine the doneness.
In this case, the traditional way of using your fingers to determine whether it is raw, medium or well-done doesn't work. It keeps giving you a raw signal until it gets completely well-done.
Raw: 6.5 minutes
Medium: 8.5 minutes
Well-done: 9.5 minutes
Based on a steak with a 1.5 inch thickness.
8. You don't need butter to add flavors if you follow the instructions above. Some TV chefs recommend to add butter. In fact, they do this at their restaurants as they use non-stick pans and their steaks lack flavors. But, we don't have to as we develop most of flavors. In case you want your steak well-done, you may want some butter.
I usually like my chicken dishes without skin on, except for fried chickens...I used to throw skins away. One day, it occurred to me that what would happen to chichen skins if I gave the same treatment as peking ducks. It didn't turn out to be like peking ducks. It was much more crispy and tastier. Now, I don't want anything but chicken skins when I buy chickens these days.
Ingredients chicken skins on 4 thighs and 4 breasts
honey 1 tablespoon
Blanching water water
salt bay leaf
ground pepper cooking wine
1. Blanch chicken skins and drain them
2. Roast them on a NON non-stick pan and cover it with another pan with the face up.
3. Remove chicken skins from the pan and get rid of excess oil.
4. Mix honey and water with a 1:1 ratio and brush this off on chicken skins
5. Put chicken skins in an oven preheated at 180 degrees for 20 minutes.
Each skin has a different thickness. As such, take out them as they are browned.
Jjajangmyeon is so delicious. Most Chinese restaurants make good jjajangmyeon but some of them have hygienic issues lately. So, I decided to make this at home and tried a few internet recipes. I was disappointed at the taste of them - there was some piggy taste and they were not sweet enough even though I put a ton of sugar.
I almost accepted the reality that we could't compete against professionals. As a last attempt, I tried my 120-180 theory (maximizing flavors by cooking at 120-180 degrees) on this and the result was a home-run! I was so excited to share this with you people.
Ingredients (for 4 people) pork 300g
black bean paste 80g onion 1
cabbage 1 cup sugar 1 tablespoon
Note that famous recipes use 4 tablespoons of sugar for 4 portions. But, I will use only 1 Tbsp and will make this sauce still sweet. If you make this for the first time, use 2 Tbsp and cut down on it later.
1. Black bean paste also needs to be cooked at 120-180 degrees. Preheat a non-stick pan at medium-low heat for a few minutes and put black bean paste. Then, stir this occasionally for 5 minutes. Use enough oil for black bean paste to be fully submerged. After 5 minutes, the smell will change to savory from disgusting. Then, turn off the heat.
2. Cut vegetables into large cubes.
3. Make sure you use a NON non-stick pan. Use a stainless steel pot if you don't have any pan.
4. Preheat your pan (or pot) for 3 minutes and oil it.
5. Sprinkly sugar on a hot pan. By burning sugar at 120-180 degrees, we will get extra sweetness from the same amount of sugar. If you put sugar after liquid is added, you have to double the amount.
This is the same reason why a baked sweet potato is much sweeter than a steamed one.
6. Add pork when sugar turs brown.
7. Add vegetables when pork is fully cooked. Stir them well.
8. Make sure vegetables touche the pan directly at least once. By caramelizing theses more, we get more sweetness.
9. Add black bean paste and mix everything well.
10. You can serve this as it is. Or add some water and starch water to make the sauce thick.
Does it sound unplausible? How can one become a good cook overnight?
I reiterate this. Yes, anyone can make delicious foods if he or she reads this blog.
There is a very simple cooking principle. All ingredients in the world develop their best flavors at the temperature 120-180 degrees (C). So, cook all ingredients at those temperatures. That simple.
steak vs steamed meat
oven-baked bread steamed bun
fried chicken steamed chicken
baked sweet potato steamed sweeet potato
Which one do you prefer? Left or right? Lopsidedly most prefer the left. You can guess the difference. The left is cooked at 120-180 whereas the right is not. That is the difference of flavors.
Probably, you would think that you already cook at 120-180 degrees but wonder why your foods are not delicious. What I am about to say may come as a surprise. Most people cook things under 100 degrees. Really? Yes, really. Oh, aren't your fried chickens tasty? Perhaps, fried foods are one of few things you cook at 120-180 degrees. It is not due to the frying method itself. It is due to the fact that whole chicken pieces are cooked at 120-180 degrees
Here I will telll you 1) why nice flavors come out at 120-180 degress, 2) how most people don't achieve such flavors and 3) what you can do to develop those desirable flavors.
1. what happens at 120-180 degress?
The reasons why such favors are developed at those temperatures are:
1) sugar, which is contained in most ingredients, develop its best sweetness at the range. This is called "caramelization"
2) protein sees an explosion of flavors when amino acid and sugar in it get together at 120-180 and create a significant chemical reaction, developing hundreds of different great flavors. This is called "Maillard reaction" or "browning reaction".
Unfortunately, flavors are not just there for us. We have to develop flavors. Someone like myself captures maximum flavors ^^ and is considered a good cook by others. But, most people end up getting only 0-10% of those and are left frustrated to eat untasty foods.
2) Why do most people fail to capture nice flavors? How am I so sure that most people fail?
From what I have observed, don't they use the below?
a
b
"What is wrong with those pans? They will easily achieve a high temperature" is something that is on top of your mind, right?
However, that is not the case. Most ingredients contain a lot of water and are most likely to be kept at a refrigerator, which is 2 degrees. Even if you preheat the pan at 250 degrees, the temperature goes down far below 120 degrees once the ingredient is placed on the pan. If there is water coming out of the ingredient, the maximum temperature the pan goes to is 100 degrees.
both are stir-fried for 3 minutes
Non-stick pans do not retain heat well. Particularly, the pan (a) has such a thin bottom. The pan (b) has quite a thick bottom. As such it holds heat better than the other. But, there is always some water coming out of steak, seafood and some vegetables and it takes a quite long time to cook. Look at the difference of caramelization in above picture. There is another problem. Another cooking principle is to keep the inside of ingredients tender and moist. However, the time spent on a pan, the more dehydrated.
3) Then, what is our solution?
It seems quite self-explanatory. Aluminum pans don't work. They are great when frying eggs and red pepper paste and so on. But, they don't work when we make steak or etc.
Get a pan with a good heat retention, i.e. non non-stick pans. Stainless steel pans (3+ ply bottom), cast iron pans, carbon steel ones and copper and etc. They can easily overcome the initial shock from cold ingredients and keep things on the pan at 120-180 degrees. You can check this out if you follow my youtube videos. Even if I have a lot of watery vegetables with beef, there is little water coming out of on the pan.
Most restaurants use stainless steel pans, cast iron pans or carbon-steel woks and etc. That is why things are tasty when we eat out.
Do we have to buy a new stainless steel pan or a cast-iron pan? NO. You already have one. I am sure that most houses have at least one stainless steel pot (with a 3+ ply bottom). That should more than work. It is even better than a Chinese wok as it has a more area and wider bottom.
But, some people still have some reservation for those pans and pots. They are too heavy, it is not easy to wash those, or things stick to those pans and etc. It is true it is heavy. But, the pan (b) is equally heavy and very expensive. Washing a stainless steel pan is even easier than a non-stick pan. Things do stick to those pans. But, it takes only 3 minutes' preheating to prevent that.
Don't you give a priority to the performance first when you buy other things with all other factors being extra? But, why don't you when it comes to cooking? It is a difficult and sad thing to eat untasty foods.
As long as you have a pan or a pot to keep ingredients at 120-180 degrees, you have nothing to worry about cooking. The way anything you fry is delicious, anything you stir-fry on a pan will be delicious. You don't study recipes anymore. Steak, pasta, stir-fried rice...you name it. They will put some restaurants to shame if you only consider the flavors. That should save you a lot of money earmarked to eating out. Let's be honest. You didn't cook a lot not because you are too busy. You didn't because what turned out was so untasty, right?
My conclusion: cook with your idle stainless steel pots, and eat delicious foods, save money and live healthy!!!
Pie dough flour 1 cup
sugar 2 tablespoons salt 1/4 teaspoons
1. Dice butter and keep it in a refrigerator.
2. Mix flour, sugar and salt in a food processor.
3. Add butter to the above and pulse it several times.
4. Add icy water to the above when the size of butter becomes small enough. Start with 2 tablespoons of water and increase it until the mixture has a dough-like consistency.
5. Pour the above on a tray and press it to a lump.
6. Divide the above into two pieces - 60:40. 60 goes to the bottome. 40 goes to the top.
7. Keep the above in a refrigerator after putting a plastin wrap around it.
8. Cut apples thinly.
9. Add sugar and cinnamon powder to apples. Set it aside after mixing them.
10. Bring out a dough from a refrigerator. Roll it out into a circular shape. Place it on a baking pan.
11. To make a top, roll the dough thinly into a rectangular shape. Fold it a few times and cut it like noodles.
12. Place apples on a baking pan and cover it with butter noodles.
13. Add 2 tablespoons of water to one egg yolk and beat it. Brush this on the pie top.
14. Put the pie in an oven preheated at 220 degrees for 30 minutes and lower the temperature to 180 degrees for another 30 minutes.
As you know, ingredients develop their best flavors at 120-180 degrees. However, they start to generate bad taste beyond 200 degrees. If we continue to bake the pie at 220 degrees, the pie will end up black and untasty.
Then, why did I set the initial temperature at 220 degrees? Even though it is 220, it doesn't mean that the pie is 220. Most of heat goes to evaporate water in apples and dough. It takes some 30 minutes for water in the pie to evaporate. Then, the pie dough starts to brown. This is when we lower the temperature to 180 degrees.
As our pie dough on top is very thin, it is like a biscuit...so crispy and so delicious.
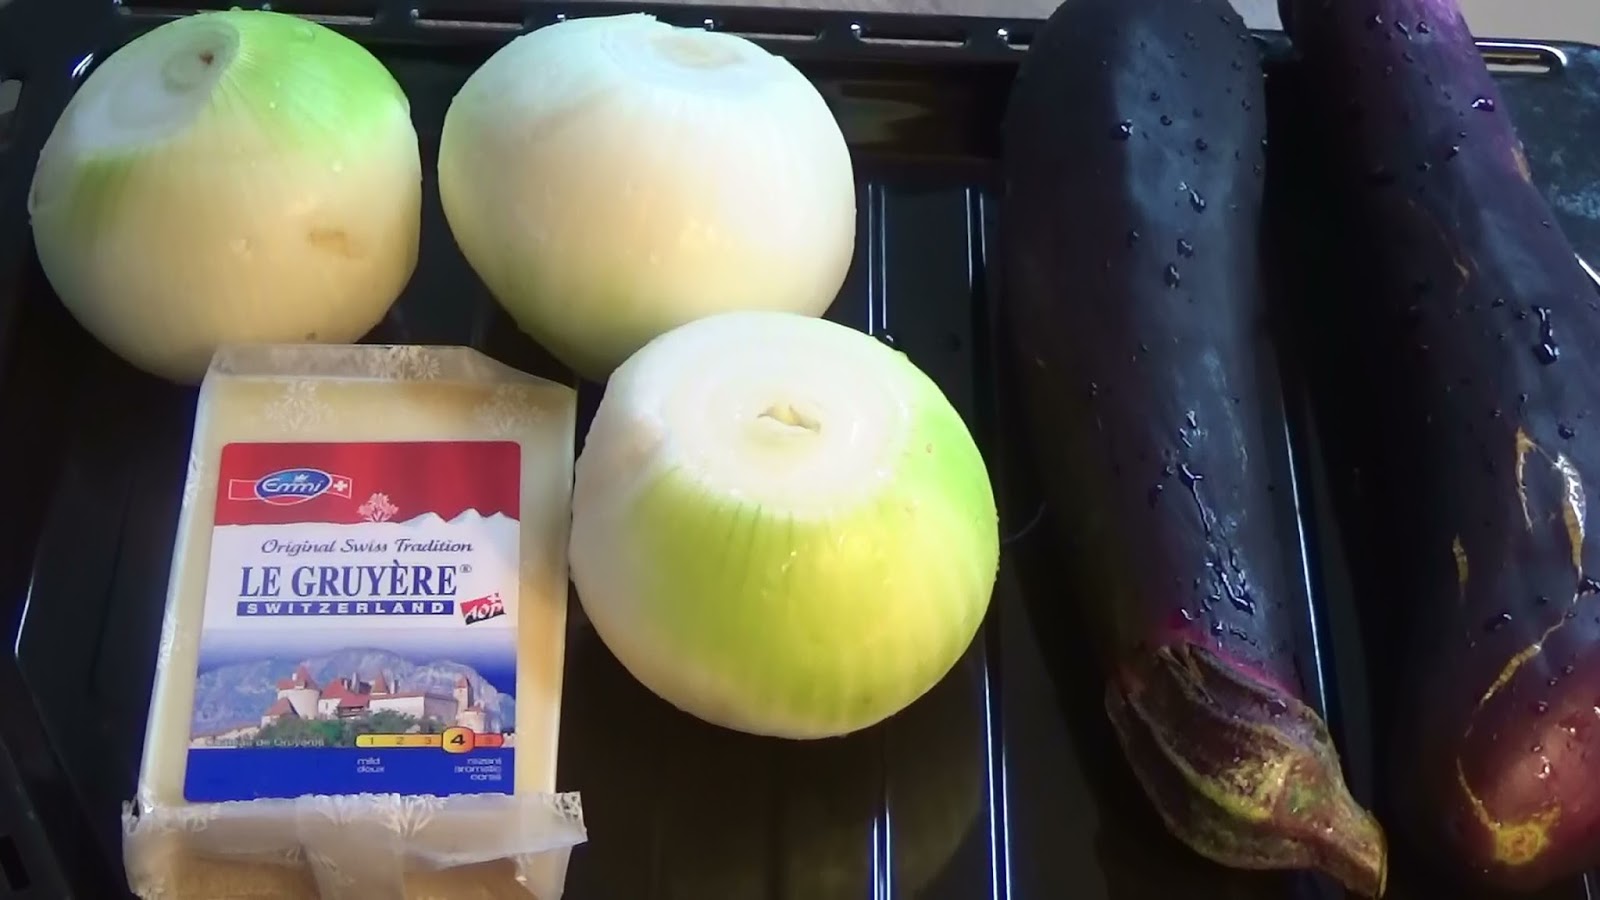
An onion soup is a special and thankful food for me. When I travel abroad and have a hang-over (i.e. when there is no jjamppong or ramyeon around), I eat this. It does serve its purpose. Or when it gets cold suddenly, the soup always warms me up.
However, I never liked the crouton in the soup but loved the cheese crusted on it, which is quite a dilemma. We overeat gluten. So, I really want gluten out of this healthy soup. Moreover, I want my soup to be further alkaline-forming (a crouton is highly acid-forming). I found a perfect solution for this and it is far more delicious.
1. Cut an eggplant into thin slices. Put salt on eggplant slices and keep them in a sieve.
2. Cut onions into thin slices.
3. Pour onion slices on a pan and stir them occasionally until onion slices turn brown.
Use a stainless steel pot or pan, which gives a much better caramelization than a non-stick pan. In case you use a non-stick pan and have a problem caramelizing, add some baking soda.
4. Add boiling beef stock to the pan and deglaze the pan. Let it boil for several minutes.
5. Cut eggplant slices into 1cm-thick strips. Weave with eggplant strips.
6. Put the above on a soup bowl with (4).
7. Sprinkle grated cheese on (6).
8. Put the soup bowl in an oven preheated at 200 degrees C for 20 minutes.


